UFOCaptureV2 users manual
3. Operation
<-Prev Index Next->
3.3 Operation sheet
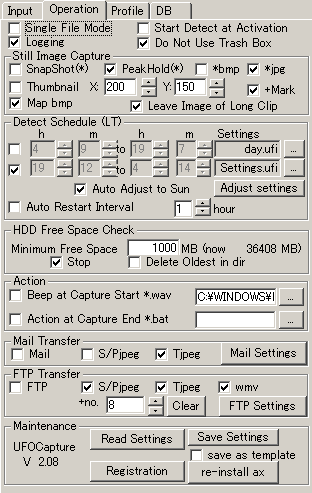
In Operation sheet you can set operation modes and etc.
[Operation mode setting]

- Single File Mode : Special operation mode in which UFOCaptureV2 output one movie file.
- All events are connected and put into one file.
- Detection perfectly continues all the time . There is no blind period after each event that is need to change files.
- When using Auto Restart Interval setting, you can divide movie file at assigned interval.
- When you set Auto Restart Interval = 1 hour, you will get movie files which contains all events happed in each hour.
- FTP,Mail,Still Image capturing, Logging cannot be used in Single file mode.
- OFF (multi file mode) is recommended for general observation.
- Start Detection at Activation :
- Detection automatically begins when UFOCaptureV2 is activated.
- Use this option when UFOCaptureV2 is controlled by outer scheduler or program.
- (V2.09) In case of detection schedule is valid, detection begins when the program is activated in the detection time.
- Logging
- Outputs a xml file which contains capturing information for each clip.
- This option must be ON when you want to process the results by UFOAnalyzer.
- Outputs "detlog.csv" to "DB dir" which contains start and end time of detection.
- Do Not Use Trash Box (V2.08)
- Files will be deleted immediately by pushing "DELETE ALL" or "DELETE A CLIP" in Operation sheet.
[Still image capturing setting]

You can set automatic still image capturing (for multi file mode).
- SnapShot peg or bmp
- One frame at the trigger will be saved as a still image.
- Snap shot is useful in daytime detection.
- Exclusive with PeakHold setting.
- PeakHold jpeg or bmp
- Automatic composite still image which contains the peak brightness of each pixel during the detection will be saved as a still image.
- Peak hold is useful in nighttime luminous event observation.
- Exclusive with SnapShot setting.
- *bmp
- RGB24 format will be used for SnapShot or PeakHold.
- You can set jpg ON simultaneously.
- *jpg
- JPEG format will be used for SnapShot or PeakHold.
- When you using 16bit color mode of display, the quality of the image might be very bad. Use 32bit mode of display.
- Thumbnail jpeg
- Creates small size jpeg image for realtime transfer.
- X: horizontal size of thumbnail image.
- Y: vertical size of thumbnail image
- +Mark: Mark of detected pixels will be overlayed.
- Map bmp
- Creates *M.bmp which contains layered information of the event.
- This option must be ON when you want to process the results by UFOAnalyzer.
- *M.bmp contains following information.
- R channel : Detected pixels the brightness of which was changed more than "Detect Lev".
- G channel : Long term averaged brightness of the pixel.
- B channel : area mask and scintillation mask pattern at the time of capture.
- Leave Image of Long Clip
- When this option is ON, all still images will be kept even in the case of movie file was deleted by the limit of "Max (sec)".
[Schedule setting]
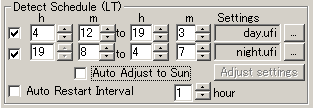
You can set automatic detection schedule here.
- 2 set of schedules can be set.
- Do not overlap 2 schedules.
- Use local time regardless of UTC mode.
- Example
- Detection will begin at 7:00 and continue to 17:00 using "Day.ufi"settings.
- Detection will begin again at 17:01 to 5:00 of next day using "Night.ufi settings.

- When you set "AutoAdjust to Sun" = ON, the time of schedules will be adjusted to sun raise and sun set automatically every day.
- To set the offset from sun raise and sun set, push "Adjust settings" button and open a dialog below.
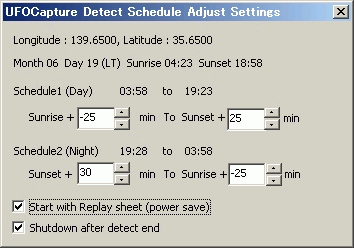
- This example show longitude 139.66NALatitude 35.65NAthe sun raise will be 04:47 and the sun set will be 18:38 on the day of 14/May.
- Schedule1 is from 25 minutes before the sun raise to 25 minutes after the sunset. it will be 04:12 and 19:03.
- Schedule2 is from 30 minutes after the sun set to 30 minutes before the sun raise. it will be 19:08 and 04:07
- Longitude and latitude must be set correctly in Profile sheet before these settings.
- This calculation assume the altitude is 0, and uses an approximate equation. There might be a few minutes of error.
- Offsets should be tuned according to your location, environments , sensitivity of the camera and so on.
- Start with Replay sheet (power save)
- Rplay sheet wiil be opened when detection begings by schedule settings.
- Shutdown after detect end
- System will shutdown after detection ends by schedule settings.
- Auto Restart Interval
- Detection will stop and start again (reset) at the interval of assigned hours.
- This option is recommended for single file mode or unstable systems.
[HDD space limit setting]

UFOCapture watches free space of the target volume in HDD at the detection of each clip.
You can set how to treat when the free space become less than assigned value.
- Stop : Stop detecting.
- Delete Oldest in dir : Delete oldest clips in the target directory (When "+Y/M/D dir" mode , delete the oldest clips in Day directory).
[Action (Capture alarm) setting]

- Beep at Capture Start
- Beep or play assigned sound file when a trigger happens.
- Action at Capture End
- Execute command file or .exe when a clip was saved.
- Assign shell-executable file such as *.bat or *.exe as the file name.
- The clip name which was recorded is added as the first parameter of the command.
[Mail setting]

You can send a E-mail when a clip was captured.
- Mail =ON: UFOCaptureV2 send a Email .
- S/P jpeg : SnapShot or PeakHold still image will be attached to the E-mail (jpeg only)
- Tjpeg : Thumbnail still image will be attached to the E-mail.
- Mail Setting: Open a Mail setting dialog below.

- "%f" in the Subject will be replaced by clip name.
- Message can be null.
- All characters should be 7-bit ASCII.
- UFOCaptureV2 does not support IMap server, please use Pop3 servers.
[FTP setting]

You can transfer captured files by FTP protocol to some internet servers when a clip was captured.
- FTP =ON : Do Ftp transfer.
- S/P jpeg : SnapShot or PeakHold still images will be transferred by FTP protocol (jpeg only)
- Tjpeg : Thumbnail still image will be transferred.
- wmv : wmv movie clip will be transferred (avi movie cannot be transferred)
- +no : A range of cyclic number is always used in the part of transferred file name.
- When assign n , each file will have 1 to n in its name.
- Detected files will have the names below (# will be replaced by the number).
- S/Pjpeg -> ufo#.jpg
- Tjpeg ->ufos#.jpg
- wmv->ufo#.wmv
- Files which was created by Time Interval Trigger will have time in "hhmm" format as below.
- S/Pjpeg -> ufoThhmm.jpg
- Tjpeg ->ufosThhmmss.jpg
- wmv->ufoThhmm.wmv
- Clear : Erase ufo*.* in the target directory by FTP protocol, and reset the cyclic number to 1.
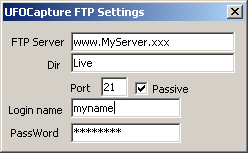
- You should set up FTP Settings below before pushing this button.
- FTP Settings : Open a dialog below.
[Maintenance and Registration]

- Read/Save all settings from/to a file
- Read Settings : Read all setting of UFOCaptureV2 from a saved file which has ".ufi" as its suffix.
- Save Settings : Save all current setting to a file.
- Important information such as FTP password or the server names will be an cryptogram.
- You can recall these information only by using same serial ID that is protected by licence key.
- save as template : When this option is ON, important information will not save to the file.
- re-install ax : re-install of the modules to your system.
- UFOCapture automatically register the execution directory which contains the dynamic link modules to Windows at the first execution.
- Push this button, when the execution directory is moved or changed and let system know the place of modules.
- Registration
- Register UFOCaptureV2 licence to your system.
- Please fill fields of the dialog below, and push Register button.
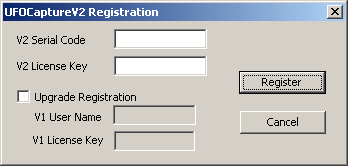
- If you use an upgrade key, check "Upgrade Registration" ON, and fill "V1 User Name" and "V1 License Key" also.
<-Prev Index Next->


![]()


![]()


