UFOCaptureV2 users manual
3. Operation
<-Prev Index Next->
3.2 Input sheet

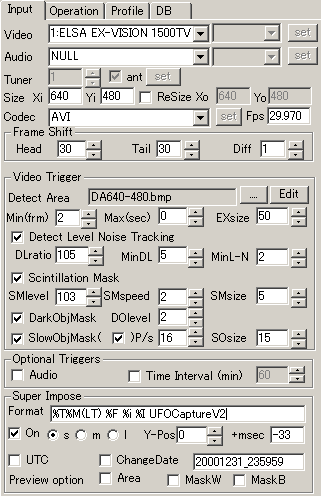
In Input sheet you can set followings.
[Input device and input pin]

- Left side combo box shows the name of capture device. Let it shows correct device which you want to use .
- In the drop down list box, there are devices which is ready in your system.
- Let devices be ready before the execution of UFOCaptureV2.
- You can select "NULL" as the input device of audio when using AVI codec. This setting may decrease CPU load.
- You cannot select "NULL" when using WMV codec, because WMV requires some audio source.
- You may get error message when the selection is not proper.
- Right side combo box shows the input pin name. Let it shows correct pin name which you want to use.
- In the drop down list box, there are pins which is available in the device.
- There might be blank when the device has only one input pin.
- General video input device has pins below. Select proper in which you want to use.
- Tuner : Input TV-tuner signals.
- Composite : Input video signal from composite pin.
- S-Video : Input video signal from S-connector.
- "Set" button opens the property setting window of the device. It can be opened only in previewing or detecting.
- You can set detail device depended parameters such as gain or gamma.
- Property setting of device will be kept until its power became off. But it will be lost by restart of PC.
- You can select TV-channel ,tuning space(antenna/cable), and property of tuner
[Resolution(size)/ Aspect ratio / Frame rate / Codec]

- Xi,Yi : number of horizontal pixels and vertical pixels in input videoB
- Must be equal to one of the capture device supports. General numbers are as follows.
|
Low resolution |
NTSC hi-resolution |
PAL hi-resolution |
| Analog input |
Xi=320,Yi=240 |
Xi=640,Yi=480 |
Xi=720,Yi=576 |
| IEEE1394(DV) input |
Xi=360,Yi=240 |
Xi=720,Yi=480 |
Xi=720,Yi=576 |
- ReSize option
- This option can be used when there is enough room of CPU performance and you want to change output pixel ratio.
- This function can only decrease of pixels.
- example
- NTSC-IEEE1394 720x480(pixel ratio 0.89:1, aspect ratio 4:3) -> Xo=640,Yo=480 (pixel ratio 1:1, aspect ratio 4:3)
- Some input device does not allow this transformation.
- Fps: (Frames per second) number of the frames in one second.
- Set 29.97 for normal NTSC video.
- Set 25.0 for PAL video.
- Set the number which your device supports when using special equipments like usb cameras.
- Codec : compressor which is used in saving of video file.
- AVI : non-compressed video format
- File would be size of Xi*Yi*2*Fps*seconds bytes without audio. (Xi=640,Yi=480,Fps=29.97-> 17MBytes/second.)
- Can be added a audio stream.
- CPU load is minimum, but transfer speed to disk is very fast.
- When you want to use UFOAnalyzer as post processing, you must choose AVI codec.
- WMV :Windows Media Video compressor.
- 640*480 -> 0.2MBytes/sec
- Audio input device must be assigned.
- CPU load is high.
- Else
- In the Codec combo box, all codecs which are installed to your computer are listed. Some of them may work well, but there may be some codecs which do not work well with UFOCaptureV2.
- Suffix of output file will be ".avi.".
[Frame Shift(time shift) settings]

- Head : Number of the frames that will be recorded before the trigger.
- You can begin recording from 1sec before the detection of a event(trigger) when Fps=29.97 and Head =30.
- Minium is 10. This is for the assurance of post processing.
- Maximum setting of the Head is depend on the memory of your PC. If you have enough memory 1000 may be possible.
- Tail : Number of the frames that will be recorded after the event ends.
- You can continue recording 1sec after the trigger ends when Fps=29.97fps and Tail=30.
- If there happens another trigger during Tail period, the recording will continue as one event.
- You can set any number as Tail, regardless of your memory size.
- Diff : Number of the interval of frames that is used to compare frames.
- 1 is recommended for general purpose.
- 2 or more is used when the motion of the target object is very slow.
- Continuous recording may happen when Head or Tail is too big.
- Once recording has begun, every short event is treated as a trigger regardless of Min setting.
- One event may be divided two or more clips when Head or Tail is too small.
- Recommended Head and Tail value is 30 or 25 for general purpose.
[Video Trigger settings]

Sensitivity of the detection is mainly controlled by "Detect Lev" and " Detect Size" in "Live" sheet.
UFOCaptureV2 basically recognize a event by the following logic.
1) Calculate the change of the brightness of the each pixel which is not masked.
2) Count the number of pixel which change its brightness more the "Detect Lev".
3) When the number of changing pixel exceeds the "Detect Size", a trigger is raised.
In this "Video Trigger" section, you can set detail options and automatic control of "Detect Lev".
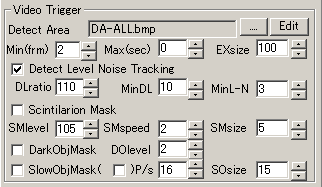
- Detect Area : File name of bitmap which contains detect area mask pattern.
- Set "DA-ALL.bmp" as the file name when you want to detect all area.
- "DA-ALL.bmp" can be used for any resolution.
- ".... ": Select the file name from stored files. Mask pattern file should have same resolution which is used in detection.
- Edit : Create or edit a area mask pattern file. Refer Mask area editor .
- Min(frm) : (Minimum frames) Minimum number of the continuous frames that should be the trigger of event.
- For example, When "Min"=10, events that have less than 10 continuous frames of triggers will be ignored.
- In night sky observation, noises caused by cosmic rays that have only one or two frame of duration is often observed in video. In this case, "Min" is recommended to set bigger than 2.
- Exceptionally you can record only big event that has less frames than "Min". Set "Exsize" to detect the events that have big size but short time of duration.
- Max(sec) : (Maximum seconds) Maximum duration of the clip which will be kept. 0 means infinite. When the recording continues more than "Max "sec, recording will stop, and the clip will be deleted after the event ends.
- Air plane or the trees that are moved by wind sometime cause very long clip . This option is intended to delete these unwanted big clip and save HDD space.
- If you have enough HDD space, this option should be set as 0 (void).
- ExSize : (Exceptional size) Number of changing pixels that should cause a trigger regardless of its duration.
- When you want to ignore cosmic rays but want to capture very short but big events such as lightning or sprite, Set "Min"=2, and "ExSize"= 30 to 100 .
- Detect Level Noise Tracking
- This option is to tune "Detect Lev" automatically by the background noise level.
- DLratio : ratio(%) between noise level and "Detect Lev". Normally 105 to 130 is appropriate.
- MinDL : Minimum value of "Detect Lev". Use this value to avoid continuous recording which happens when "Detect Lev" become too low .
- MinL-N : Minimum difference of "Detect Lev" and noise level. Use this value to keep margin.
- Scintillation Mask
- This option reduce the influence of the light of fixed starts which is vibrated by atmosphere and achieve very high sensitivity of true moving object in night sky.
- In this function, UFOCaptureV2 automatically determines the precise position of long term bright objects like stars, and mask the object with a few pixels around it.
- This information is kept in the *M.bmp file so that it can be used for the precise determination of FOV.
- You can see the masking pattern in real time by setting the option of "MaskW" or "MaskB" in "Super Impose" section.
- You can see the position of very dim fixed stars even which may not be visible by human eye.
- SMLevel : Minimum ratio(%) of the brightness of starts compared to the background.
- Normally 105 to 110 is recommended for night sky observation.
- No start will be found when it is cloudy.
- CCD sensitivity difference will appear in lines when SMLevel is too low.
- SMSpeed : Detection speed (1`5)B
- Normally 2 is recommended.
- When using long focus lens and stars move faster than mask pattern changing , set 3 or more to catch up the movement.
- SMSize : Mask size parameter(1`9)B
- Normally 5 is recommended.
- Tune this parameter and let the mask cover enough area around stars.
- Scintillation Mask may increase CPU load. You should check CPU load and keep appropriate margin.
- Dark Object Mask
- This option reduces the detection of the movement which is is darker than background.
- DOlevel:
- Normally 0 to 3 is recommended.
- When you set this too high, even bright objects may be not be detected.
- This function is not perfect but very effective in night sky observation.
- This function uses a part of Scintillation Mask function, so CPU load may increase.
- Slow Object Mask
- This option tracks the objects that move slowly and mask the area around it in real time.
- Once some object is detected, this function observe it for 3 seconds, calculate its moving speed, and mask it when it is continuous slow moving object.
- The first checkbox is the on/off of this dunction. The second checkbox(V2.10..) is on/off of the dispay of the masking position. When second checkbox is on, Slow Object Mask area is shown in white rectangle in view area. While gray rectangle is the mark of observing stage.
- When it is a slow object and is already begin recording, recording will be canceled.
- Maximum number of simultaneous object is depend on CPU power. normally 10 or 20 objects may not cause problem.
- Pixel/s : Highest speed of which should be masked.
- Normally 15 is recommended for wide lens. 40 is recommended for narrow lens.
- SOsize : Size of mask pattern (pixel length of the edge of mask rectangle)
- Normally 15 is recommended for wide lens to avoid the effect of the flash lights of air plane.
- This function is very useful to reduce the capture of airplanes.
[Audio trigger / Time interval trigger]

- Audio :
- Audio trigger can be added to video trigger.
- An audio trigger is raised when audio signal level exceed audio threshold level which is set in "Live" sheet.
- Some signal from external equipment which is input to audio device can be used as trigger signal.
- Time shift is also valid in audio triggering.
- Time Interval (min)
- Repeated trigger will be raised in same interval of assigned minutes.
- Trigger time is count from 0 minute 0 hour of the day.
- For example, when you set 120 at the 1:20, trigger will be raised at 2:00, 4:00, 6:00 .....
- Time interval trigger can be used with other triggers.
[Super impose / Date and Time mode]

Set the super impose string to movie, still image, preview..
- Format: any 7-bit ASCII characters can be set as string.
- Special characters
- %T : Date and time in Japanese stile like "2005/12/31 23:59:59"
- %t : Date and time in English stile like "31/Dec/2005 23:59:59"
- %M : Milliseconds of time.
- %m : 100 millisecond of time (V2.22).
- %C : Clip number from the beginning of detection
- %F : Frame number
- %L : Detect Size, Detect Lev and detection mark
- %I : LocationID and CameraID which is assigned in "Profile" sheet
- %i : Camera name and Lens name which is assigned in "Profile" sheet
- Be aware that the line must be 1 line and should not exceed size of video.
- On : Validate super impose to video and still image.
- S: Small character
- M: Middle character
- L: Large character
- Y-Pos: Vertical position of super impose line. 0 means bottom.
- +msec: (V2.08) offset to the super impose time(msec).
- UTC:
- ON: UTC is used as the time which concern to super impose string and clip names.
- OFF: Local time used as the time.
- ChangeDate
- ON: Assigned date and time is treated as the time of next start of detection.
- Use this option when detecting from recorded tapes.
- Assign date and time in format of "yyyymmdd_hhmmss".
- OFF: PC's clock is used.
- Preview option : (this option is just for previewing , masks are not stored into movie)
- Area: Overlay the area mask pattern in gray color.
- Mask W : Overlay the scintillation mask pattern in white color.
- Mask B : Overlay the scintillation mask pattern in black color.
[Area mask editing]
Area mask is fixed pattern of the detection area. By using area mask, you can eliminate the effect of movement such as trees moved by wind or the change of ground lights or pre-super imposed time stamps.
Area mask editor is activated by pushing the "Edit" button of "Detect Area" line in "Video trigger" section.
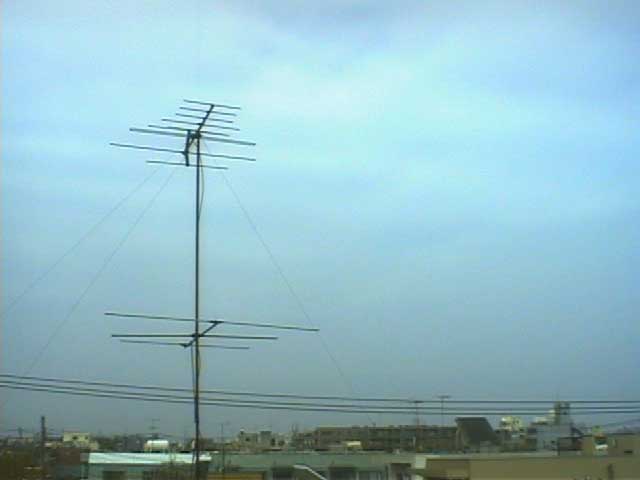
Before using this function, Do preview and stop to the view area have actual still image of the view. Then you can edit mask over the image of the view.
For example assume still image is below.

In this case, houses on the ground may have unstable lights in night, and the TV antenna may be moved by wind or lighted by some ground lights.
Therefore detect area mask pattern(dim red) like below . Then you can eliminate all the effect of masked area.

Detect Area Editor has functions below.
All Detect : Set all area to detect
All Mask : Set all area to mask
Auto Set : Set automatically dark part of the image as mask.
- Lev : Brightness level(0 to 255) of the area that should be masked.
- Ratio : Brightness level ratio compared with the surround area where should be masked.
- Set: Set automatic mask pattern.
- You can change Lev or Ratio and see its effect in real time.
- You can edit manually afterwards.
Color: Select painting color
- Detect : clear -- detection area
- Mask : dim red-- masked area
Shape : Select painting shape
- Rect : You can draw rectangles by dragging in the view area.
- Line : You can draw a line of "Blush Size" width by dragging in the view area.
- Pen : You can plot a circle and draw curves by right clicking in the view area.
Blush Size : Select blush size
- S to LL, 4 size. S means pixel editing.
Cancel : abort editing and back to UFOCaptureV2.
Save : save as specified name file and use it as the area mask pattern of UFOCaptureV2.
Caution.
- Mask file size must be equal to video size. Please make mask pattern for the resolution using.
- DA_ALL.bmp is special file name for all resolution. Do not edit this.
- You can edit Mask file by other tools. In that case black means detection area, and red means mask area.
<-Prev Index Next->


![]()
![]()

![]()


